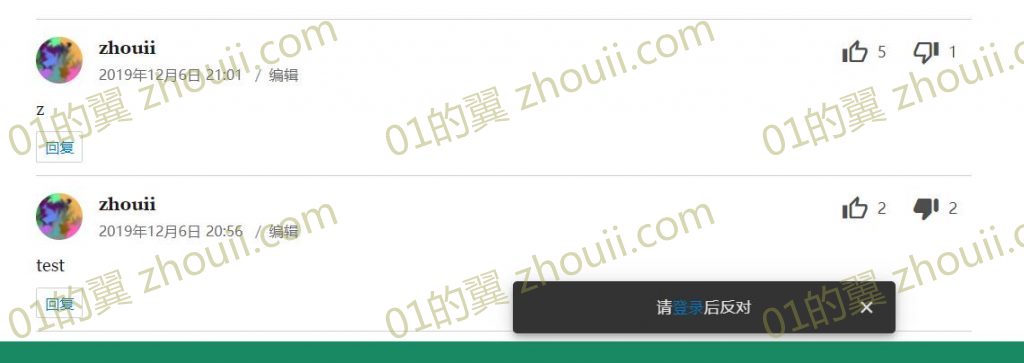
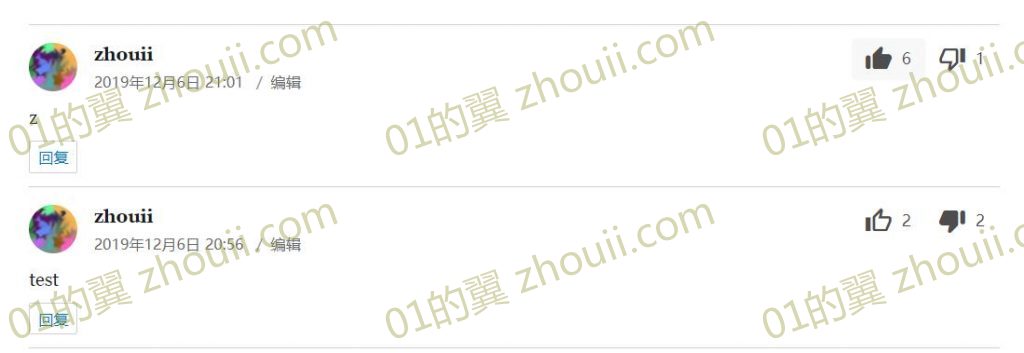
知乎、IT之家等诸多网站都有赞同和反对功能,想给我的博客也加上,但看了一下网上的各种代码和插件,都是通过Cookie来防止重复赞同或反对的,对于信息安全专业的我来说这太不安全了!恶意用户轻轻松松就能刷很多赞同或反对,于是我自己修改Wordprress代码实现了这一功能,赞同或反对的用户需要先注册账号
在尝试点击时会提示需要登录后赞同或反对

登录后再点击就能成功赞同或反对,在对某条评论赞同或反对后就不能再对其赞同或反对

对上面那条没有赞同或反对的评论点一下赞同键后这个键就会由空心变实心,让用户知道赞同完成了

这里记录一下方法,也欢迎大家取用:
1、为减少数据库查询,我没有采用一些插件用的增加评论的metadata的方法,而是在comments表里直接增加字段,首先修改wp-includes目录下的class-wp-comment.php文件,在class WP_Comment {后增加
public $comment_up;
public $comment_down;
随后在数据库执行以下SQL语句增加相应的同名字段
ALTER TABLE `wp_comments` ADD `comment_up` INT NOT NULL DEFAULT '0' AFTER `user_id`, ADD `comment_down` INT NOT NULL DEFAULT '0' AFTER `comment_up`;
这样$comment中就能包含赞同数与反对数而不用额外读取metadata表来获取了
2、修改wp-includes目录下class-walker-comment.php文件,把<footer class="comment-meta">和<?php之间的<div class="comment-author vcard">修改为
<div class="comment-author vcard" style="position: relative;"> <div style="position:absolute;right: 0;"> <button class="mdc-button" data-mdc-auto-init="MDCRipple" to="up"> <div class="mdc-button__ripple"></div> <i class="material-icons-outlined">thumb_up</i> <?=$comment->comment_up ?> </button> <button class="mdc-button" data-mdc-auto-init="MDCRipple" to="down"> <div class="mdc-button__ripple"></div> <i class="material-icons-outlined">thumb_down</i> <?=$comment->comment_down ?> </button> </div>
从而让comments表中的comment_up与comment_down在每条评论中显示出来
3、在数据库中执行以下SQL语句创建一个保存用户操作记录的表,是用来防止用户重复操作用的
CREATE TABLE `wp_comment_rate_log` (
	`id` bigint(20) NOT NULL AUTO_INCREMENT,
	`user` varchar(50) NOT NULL,
	`post_id` bigint(20) NOT NULL,
	`comment_id` bigint(20) NOT NULL,
	`to` enum('up','down') NOT NULL,
	`time` datetime NOT NULL DEFAULT CURRENT_TIMESTAMP,
	`ip` varchar(50) NOT NULL,
	`ua` text NOT NULL,
	PRIMARY KEY (`id`),
	KEY `comment_id` (`comment_id`)
) ENGINE=InnoDB DEFAULT CHARSET=utf8mb4
4、在wp-content/themes/的主题文件夹下有当前主题header.php,在<?php wp_head(); ?>后插入以下代码从而加载Material Design资源,我前端的按钮、底部提示用的都是Material Design
<link href="https://cdn.staticfile.org/material-components-web/4.0.0-canary.e851d4f40.0/material-components-web.min.css" rel="stylesheet">
<script src="https://cdn.staticfile.org/material-components-web/4.0.0-canary.e851d4f40.0/material-components-web.min.js"></script>
<link rel="stylesheet" href="https://fonts.googleapis.com/icon?family=Material+Icons|Material+Icons+Outlined|Material+Icons+Round">
5、编辑同在主题文件夹下的footer.php,在</div><!-- .site-content -->之后插入
<script src="https://cdn.staticfile.org/jquery/3.1.1/jquery.min.js"></script>
<script>
window.mdc.autoInit();
var rating=null;
$('.mdc-button').click(function(){
$(this).blur();
if (rating!=null) return;
id=/\d*$/g.exec($(this).closest('article').prop('id'))[0];
rating=[this,$(this).attr('to'),$(this).html()];
$(this).html('<img src="https://tiny.zhouii.com/public/pending.gif" style="width:20px;height:20px;" />');
$.ajax({
type:'post',
url:'/blog/my-comment-rate.php',
data:{id:id,to:$(this).attr('to')},
dataType:'json',
success:function(res){
if (res.success) {
$(rating[0]).html('<div class="mdc-button__ripple"></div><i class="material-icons-round">thumb_'+rating[1]+'</i> '+(parseInt(/\d*$/.exec(rating[2])[0])+1));
} else {
snackbar.timeoutMs=res.time;
$('.mdc-snackbar__label').html(res.msg);
snackbar.open();
$(rating[0]).html(rating[2]);
}
rating=null;
},
error:function(){
snackbar.timeoutMs=5000;
$('.mdc-snackbar__label').html('联网失败,请检查网络连接');
snackbar.open();
$(rating[0]).html(rating[2]);
rating=null;
}
});
});
const snackbar = new mdc.snackbar.MDCSnackbar(document.querySelector('.mdc-snackbar'));
rate_historys=<?php require_once __DIR__.'/../../../../acct/head.php';echo json_encode($wpdb->get_results("SELECT `comment_id`,`to` FROM wp_comment_rate_log WHERE user='{$acct->user}' AND post_id=".get_the_ID()),JSON_UNESCAPED_UNICODE)?>;
for (rate_history of rate_historys)
$('#comment-'+rate_history.comment_id).find('[to='+rate_history.to+'] .material-icons-outlined').prop('class','material-icons-round');
</script>
这段代码可以在用户操作时向my-comment-rate.php发出请求,并展示结果
其中/acct/head.php是我自己编写的账号系统的环境配置文件,如果用户已登录就会有$acct->user为当前用户的用户名。你可以把$acct->user替换成你账号系统的用户名变量
6、在博客目录blog下创建my-comment-rate.php文件用来处理用户操作请求
<?php
require( dirname( __FILE__ ) . '/wp-load.php' );
require_once '../acct/head.php';
nocache_headers();
function jsonexit($success,$time=0,$msg='') {
	if ($success) exit(json_encode(array('success'=>true),JSON_UNESCAPED_UNICODE));
	exit(json_encode(array('success'=>false,'time'=>$time,'msg'=>$msg),JSON_UNESCAPED_UNICODE));
}
if ($acct->user!=null) jsonexit(false,10000,'请<a href="javascript:login();">登录</a>后'.($_POST['to']=='up'?'赞成':'反对'));
$history=$wpdb->get_row( "SELECT `to` FROM wp_comment_rate_log WHERE user='{$acct->user}' AND comment_id='{$_POST['id']}' LIMIT 1", ARRAY_A );
if ($history!=null)
	jsonexit(false,'4000','你已对此评论'.($history['to']=='up'?'赞成过':'反对过'));
$post=$wpdb->get_row( "SELECT comment_post_ID FROM wp_comments WHERE comment_ID='{$_POST['id']}' LIMIT 1", ARRAY_A );
if ($post==null) exit;
if ($_POST['to']=='up' || $_POST['to']=='down') {
	$wpdb->query("INSERT INTO wp_comment_rate_log (`user`,`post_id`,`comment_id`,`to`,`ip`,`ua`) VALUES ('{$acct->user}','{$post['comment_post_ID']}','{$_POST['id']}','{$_POST['to']}','{$_SERVER['REMOTE_ADDR']}','{$_SERVER['HTTP_USER_AGENT']}')");
	$wpdb->query("UPDATE wp_comments SET comment_{$_POST['to']}=comment_{$_POST['to']}+1 WHERE comment_ID='{$_POST['id']}'");
}
jsonexit(true);
这里同样先配置了我自己的账号系统的环境,用到了$acct->user作为用户名
另外,我在require的文件里对用户输入先进行了处理以防SQL注入攻击,切勿在没有对用户输入处理时直接使用这段代码
经过以上的操作后就能够添加Wordpress评论区赞同与反对的功能啦!